BIG FOOT FOOD FOREST
  • Home
  • Big Foot Letters
    • Newbie Farmer
    • Chicken Letters
    • Building
    • Mushrooms
    • Heritage sheep
    • Instructionals
    • 2022
    • 2021
    • 2020
    • 2019
    • 2018
    • 2017
  • About
    • What we do
    • Who We Are
    • Our Local Partners
    • Past newsletters
    • Contact
  • Shop
    • Rainbow Egg CSA
    • Food Scrap Exchange
    • Straw Bale House Workshop >
      • Register for Workshop
  • Visit
    • Community work days

2022

Raising the timber frame!  A step by step account of how we raised ours.

6/21/2022

 
Picture
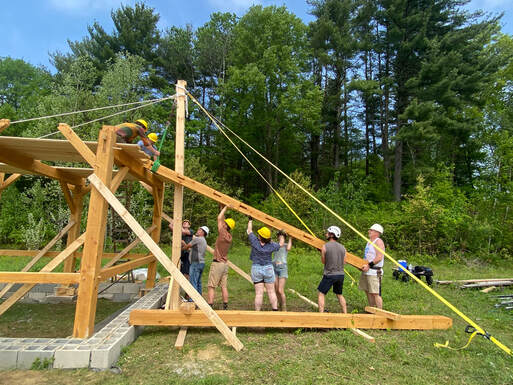
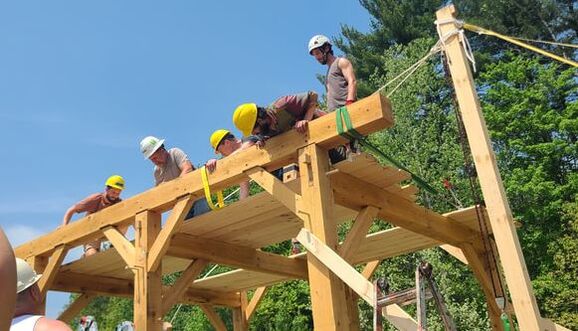
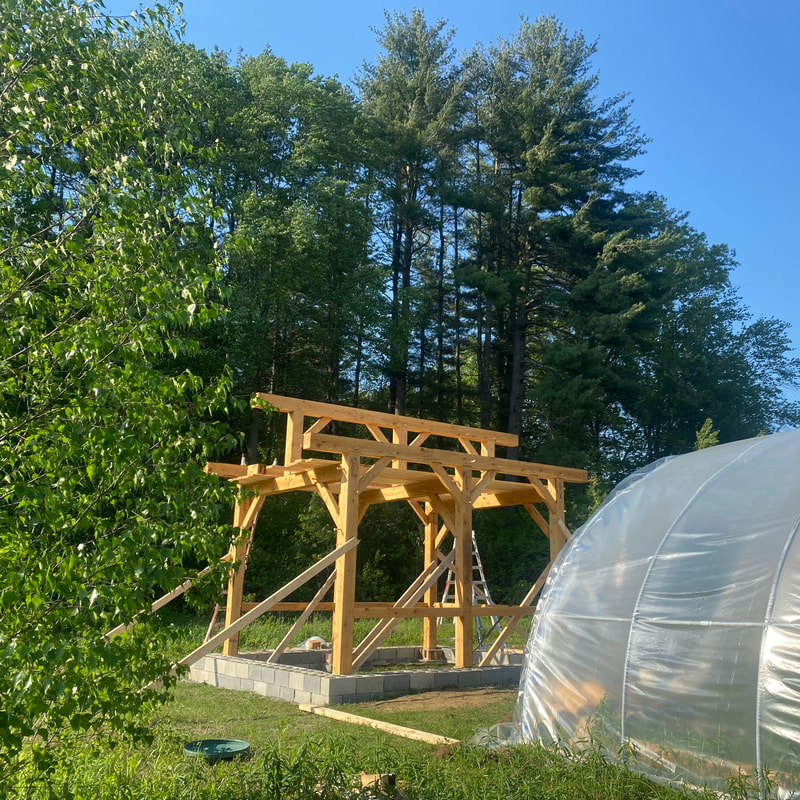
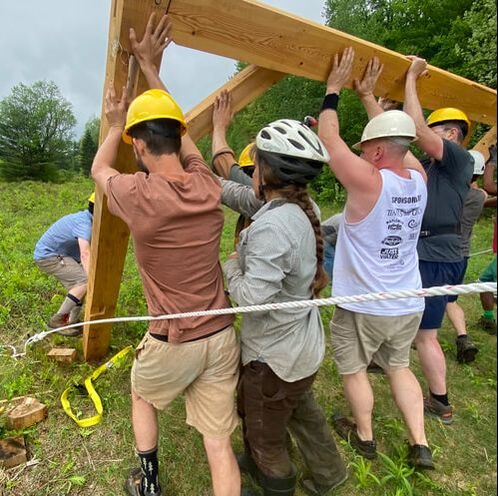
​It was the morning of May 21 and Mark and I were out at 7 AM.  It was going to be hot, so we wanted to start early!  With us were Mark’s friend Jeff Goldenson and his 8-year old daughter, Joya; Auyon Mukharji from the band Darlingside, with us for two weeks on workaway; Ari Okun; Kelly Vaillancourt and Dan Taylor from Templeton MA; Chris Monahan all the way from Rochester NY (go Chris!); Willie Crosby, Moo Butler and Emma Golden, all from Montague. Ezra Ward, from Woodsmith Forestry just down the road (also a workshop attendee) had agreed to lead the day.   A fun group!
 
We did not find much online about the practicalities of raising a timber frame with a group of people.  Yes, YouTube has some videos, mostly in fast motion, of people raising frames by themselves or with a group.  We found these of mediocre use: the motion was too fast to follow, and key moments tended to be missing – like how do you get  the extremely heavy plates (long posts that go lengthwise along the building) up on the bents (arches that go cross-wise); or how do you keep a bent from falling over once you have raised it but not secured the braces yet?   So, we were happy to have Ezra with us!  I am going to try to fill in some of those practical gaps in this letter.

Picture
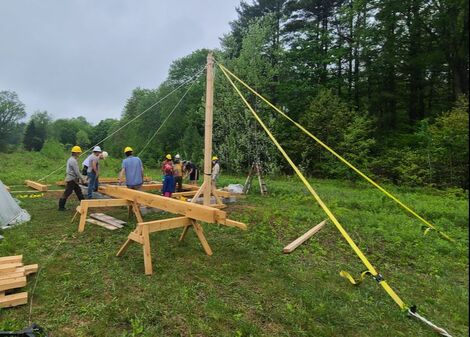
The day before the raising, Mark had built a gin-pole.  A gin-pole is the oldest form of crane, invented by the Greeks in the 6th century BC.  It is basically a long post – ours was 14’ – that stands on a T-shaped footing and leans ever so slightly forward with a pulley at the top.  It is held at the desired angle by two strong ropes anchored firmly in the ground behind the post (Mark used two rebar posts per rope).  There are also two ropes angled forward and anchored slightly less firmly. At the top of the gin-pole is a pulley. Ours had a 1:4 ratio, which worked out OK for this small frame.   The purposes of the gin pole were to help lift any heavy (or even not so heavy) beams and posts; to help erect the bents; and to hold the bents upright while braces out of 2x4 braces were attached (two braces, one going forward one backward, for each bent post). 


Picture
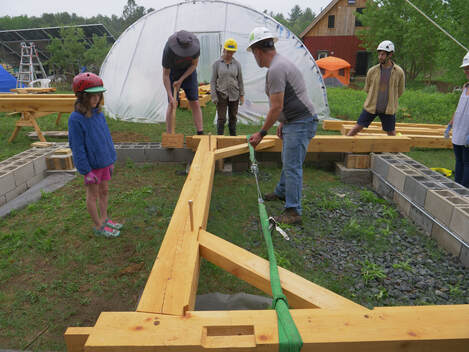
 And now, the story of how we erected our timber frame!

The first things to go up are the bents.  Each bent is an arch that consists of three main pieces: the vertical posts that sit on the ground, and a horizontal crossbeam that keeps the posts from falling inward or outward.  Each bent also has two angled braces that connect the posts to the crossbeams.   These pieces are assembled on the ground.  Pegs to hold the braces and wedges to hold the dove-tail tenons that connect post to crossbeam also go in.  In our case, we also had a girt at about 3’ height.  The pieces are nudged together with a huge Thor-like hammer made from wood, alternatively called a Persuader, the Commander, or the Beetle.   All the bents are assembled before lifting them into place.

Picture
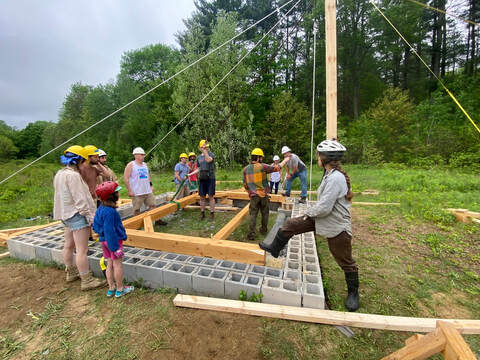
​You can (and maybe should) assemble the bent right at the position from whence it will be lifted upright, but in case you can’t or forget to, you have to move the bent - which is now too heavy for one or two people to move -- to the position from where it will be lifted up.  In our case, about 8 of us took straps, and threaded them under the posts and the crossbeams.   Then Ezra called out “Anybody not ready?  OK, one, two, three, lift” and we all lifted the bent together and placed the ends of the posts right at the edge of the little concrete piers that they were going to sit on.

Safety tip on carrying with straps: it is tempting to wrap the straps around your hand or wrist as it makes carrying easier.  However, as Ezra told us, if you do this, you are attached to the strap, and if whatever heavy thing you are carrying starts to tumble, you will not be able to let go of the strap, and you will tumble with the heavy thing, possibly injuring yourself.  So always carry the straps in a manner that you can immediately let them go and toss them away if need be

Picture
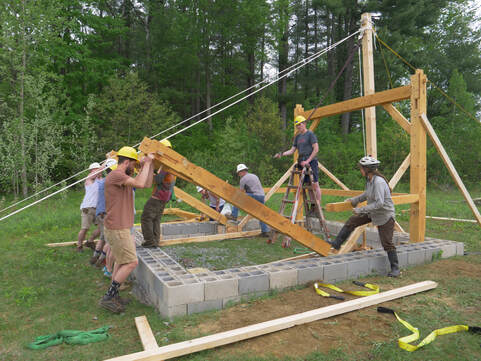
To lift the bent to the upright position, we first attached a strap from the gin pully to the center of the cross beam.  One person was positioned at the gin pole to pull the bent.  Two people were each at the ends of the posts, with their feet against the ends to make sure the posts would not slip as the bent was lifted.  The rest was positioned around the posts, and at the crossbeam.  Again, Ezra called out: “Anybody not ready?  OK, one, two, three lift!” and the whole team lifted that heavy bent right up into a vertical position.  Once it’s vertical, it’s somewhat stable and two people can stand at each post and hold it in place.  We also had the crossbeam still strapped and held up by the gin pole.   While the bent was held in place, a couple of people put up the braces – 8- or 10-foot 2x4’s affixed about 4’ up the post and diagonally to the ground, where they can be held in place by a wooden stake. ​

Picture
Picture
Picture
Picture

​​The next bent went up pretty much the same way, except that the strap to hold the bent up was attached once it was vertical by Mark who was standing on a ladder ready to put the strap in place (when the bent was lying down, the bent was too far from the gin pole to use the pulley system).  For the third one, I don’t remember whether we were still able to use the gin pole – which was standing at the other side of the building from that last bent.  We may have just manually heaved it up and held it in place while it was being braced.   We also had girts attaching the bents at around 3’ and those had to be nudged into their mortices while the bents were being lifted, which sounds difficult, but was not: everything fit.  For those girts, pegs were hammered into place to hold the frame together as it went up. 

​Once the bents are all up, a temporary floor is put in across the crossbeams with whatever extra planks you have.  This floor allows folks to stand up at the level of the crossbeams to lift the plates and ridge beam (if you have one) into place.  The plates are huge beams that extend the entire side length of the building.  Each of our 18’ plates probably weighed around 300 lbs.  So how do you get these 8’ up into the air?  In our case, we brought the plates to the gin pole (multiple folks carrying it with straps) and wrapped a strap firmly around it at the end and attached the strap to the gin pole pulley.  We then lifted that end, using the pulley, up to the level of the temporary floor.  There, some folks received it and put the end to rest on the crossbeam.  The strap was then moved to the middle of the plate.  From there, it could be lifted further using the pulley system, while a team of people - “One, two, three, lift” – helped heave the plate up, and folks up on the building were also pulling the plate on to the temporary floor.  Oof!  It worked!  The next step is to put the plate on the three posts and the four braces that make up one side of the building.  Each of the posts has a tenon, as do the four braces, so there are seven tenons in all that all need to fit exactly into the seven mortices cut into the plate.  Will it fit??   Six people shimmied up to the temporary floor.  Three straps went around the plate – two at the ends and one in the middle – and two people each held a strap.   On “Anybody not ready?  OK, one, two, three, lift” all six people were able to heave that heavy plate about 18” up and first on to the edge of the posts, and then with a second “Lift!” up and over and on to the tenons.  They did not all immediately fit, but a little work with the Commander and some mallets slowly aligned all the tenons with the mortices, until at last, with a somewhat scary, but also immensely satisfying “THUMP” all the tenons slipped into the mortices and the plate fell into place.  The second plate went up the same way.  

​The last piece we did on that day was put up the ridge beam and the king posts.  King posts are short little posts that sit in the center of each cross beam, and that hold up the central ridge beam which holds the rafters.  You can also build a timber frame (like our house) in which you omit the ridge beam, and the rafters just meet in the middle at the nook of the roof.  In this case, you must deal with outward thrust on the walls and posts, which we did not want to because we have a low pitch (more thrust) and a green roof (more weight).  When you have the king posts and the ridge beam, all the weight of the rafters goes straight down.  We put together the combined king post and ridge beam assembly up on the temporary floor - getting the ridge beam up using the same system as the plates, while the king posts with braces were easy just with the gin pole.  Then a team of about six people set the whole thing upright, in a similar manner to erecting the bents, but a longer and lower assembly (the king posts were only 4’ tall), aiming to get the tenons from the king posts into the awaiting mortices on the cross beams.  ​Again, some work with the Commander and the now familiar “THUMP” to signal all the pieces were in. 

That was it!!    We did some finish work hammering the pegs further into place and putting some strapping around the posts to get them to be slightly better placed on their piers.  Then we had popsicles and we all went swimming!  It was fantastic.  What a great day!! 

​
The next day, Mark and I put up all the rafters.  These were easy to lift with a strap and the gin pole, one person managing the pulley and the other on the temporary floor pulling the rafters up and on to the floor.  We then put them all up on the plates and the ridge beam – something two people could manage easily.  We first had them all lined up close to each other at one end of the roof, so we had plenty of room to lift the last rafters up and put them in place.  Once all the rafters were on the plates and ridge beam it was just a matter of shimmying them over to their final resting places and attaching them with some long timber lock screws. 
 
And that is the story of how we raised the timber frame - with help from some friends and a little mechanical advantage from an ancient crane!​

Comments are closed.
Powered by Create your own unique website with customizable templates.
  • Home
  • Big Foot Letters
    • Newbie Farmer
    • Chicken Letters
    • Building
    • Mushrooms
    • Heritage sheep
    • Instructionals
    • 2022
    • 2021
    • 2020
    • 2019
    • 2018
    • 2017
  • About
    • What we do
    • Who We Are
    • Our Local Partners
    • Past newsletters
    • Contact
  • Shop
    • Rainbow Egg CSA
    • Food Scrap Exchange
    • Straw Bale House Workshop >
      • Register for Workshop
  • Visit
    • Community work days